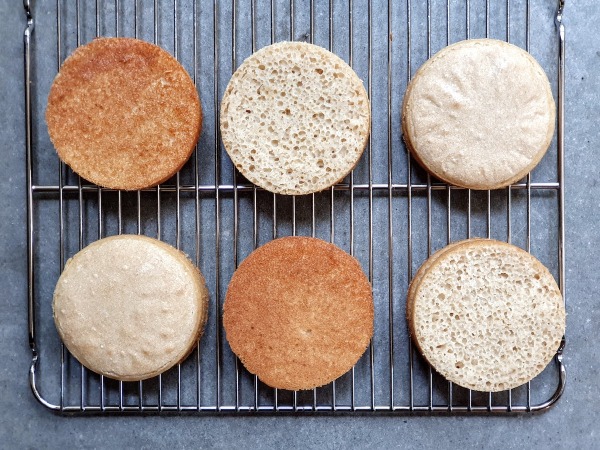
Baked sourdough crumpets
Anyone with a sourdough starter will likely have made crumpets. They’re an easy, rewarding entry point to sourdough, and they turn build-ups of fed starter into breakfast rather than waste.
But while I love crumpets, I have a pet hate for babysitting things on the stove. So when I was gloriously gifted 7 crumpet rings, I wanted to develop a go-to crumpet that I could make with a big batch of sourdough starter – which I develop quickly, because I never “discard” any dough with each feeding (I just let it build up). After months of experimenting and rave reviews from friends, my gift to you is crumpets all ready at the same time, that you can freeze for a steady toasted supply for days after.

Purists might say baking disqualifies these from being crumpets. And true, the tops of these seal over – but this means that when split, you get double the nooks and crannies. There’s also extra bonus crispiness on the bottoms when they’re toasted.
Altogether, smeared with butter and toasted, these are a crispy, soft and pillowy expression of “milk and honey” – but not so much they aren’t as flexible as toast. They are a hug to whoever enjoys one in the morning before the day begins.
I’ve lost count of how many batches it took to get to this, and that’s why this post is unashamedly long – knowledge from months of crumpet making is included, plus years of sourdough tending. The lack of these notes in most online recipes does a disservice to sourdough – you need a fair bit of knowledge upfront. Sourdough demands you engage your senses rather than blindly following a recipe. That means someone needs to tell you the signs to look, smell, and feel for, and how to use time and temperature as ingredients (thanks Ken Forkish!). Once you’ve made these crumpets successfully though, they’ll be super easy to keep churning out. I hope they’ll become a new routine for you. And that you’ll discover some “signals” you can apply to other sourdough recipes too.

Baked sourdough crumpets recipe
Makes 7 x 10cm crumpets, more or less depending on crumpet ring size.
Equipment needed:
- Completely flat baking tray
- Crumpet rings around 1inch high (grease even if you’re using non-stick)
Ingredients:
- around 10g butter or coconut oil to grease the baking tray and crumpet rings
- 550g 100% hydration active white sourdough starter – this means equal weight of flour and water, and active means it has at least risen from when it was last mixed. Note it should not smell like alcohol – if it does you need to feed it until it no longer smells like alcohol. If you’re not used to mixing dough, I’d also advise you bring to room temp so the dough will be more fluid-feeling and easier to mix and pour.
- 50g plain yogurt – I haven’t tried coconut yogurt but you can give it a go as long as it’s a bit tangy.
- 1/2 tsp or 3g table salt
- 2 tsp or 16g honey (eyeballing this is fine, you can also use light brown or raw caster sugar)
- 100g white flour (bonus if it’s stoneground wholegrain flour)
- 3/4 tsp baking soda, sifted (5g)
In a large mixing bowl that will easily accommodate double the sourdough starter volume, mix the starter, yogurt, salt, honey, and flour and baking soda thoroughly – go for an extra minute even when no streaks of flour are left (so you’re guaranteed not to get a streak of baking soda – HIGHLY unpleasant eating!). When you stop mixing and leave the batter for a few seconds, the mixture will look and feel a bit bubbly when you lift the spoon out.
Generously grease baking tray and crumpet rings with butter/coconut oil, and arrange the rings on the baking tray – leave a couple millimetres space between them. This is best to do after mixing, while the dough has a chance to rest and the additional flour has a chance to hydrate.
Pour the dough into the crumpet rings, filling them halfway. You may need to “cut” the dough with the edge of your spoon/spatula if it was cold to get it out. If it was room temp it should be more like batter.
Let the dough rise until almost double in height and even bubblier (the bubbles are also bigger). If you used cold dough: Pop your tray in the oven, turn it on to max heat for a minute (or 20 sec if your oven heats super-fast), then turn off. This will warm it up. If you used room-temp dough: this shouldn’t take more than an hour or two at room temp depending on your starter, but if they’re a bit slow your starter might just be too fresh – speed things up with my oven trick for cold dough.
Heat oven to 150C (300F) and bake crumpets for 15 minutes, rotating the tray half way. At 7 mins the tops should be dry – now check the edges aren’t brown (if so your oven is running hot). After 15 mins the bottoms should be lightly golden, but not brown (they will burn when you toast them if you go too dark now). If not your oven might be a bit under temp – note this and bake a few mins longer until lightly golden. Let sit a minute (no longer, or you’ll lose a lot of crispness) before dislodging them from your baking tray with a spatula. Cool on a rack until warm enough to shimmy out of the rings. They might need a bit of coaxing (this is why butter or a solid fat is important for greasing!), but they should come out – push from the top, near the edges.
Split in half with a sharp knife (as in, can cut a tomato cleanly without being serrated), and toast if you want crispy bottoms, or eat fresh and soft.
What to eat with these crumpets
Basically, anything you’d have with toast – and these are great defrosted in the toaster (I put mine through the lowest setting, twice, flipping in between because I have a shit toaster). If I’m too lazy to make bread with my sourdough, I’ll have avo on crumpet and it’s still delicious! Spreadable ricotta and honey is one of my faves, especially with some chopped stone fruit, fresh or dried. Tahini and date (or maple) syrup would be a great vegan alternative if you end up making these vegan with coconut yogurt and oil (also good if you’re trying to reduce your dairy intake).
Also, they are great as burger buns! Sometimes I make a special omelette in the crumpet rings too to fit snugly inside (you could do the same with a burger).
Modify this recipe!
I developed these crumpets to taste extra-special on their own, because I almost exclusively eat these or bread from my starter. So to make these taste more substantial, I added yogurt – the sourness helps further offset that alkaline baking soda flavour. This means you’ll get delicious crumpets even if your starter is on the fresh side, and not sour enough to balance out the soda). Honey adds extra depth. And if you can find it, stoneground wholegrain flour makes these healthier, toastier and nuttier.
I’ve made this with many variations – so honestly feel free to experiment and adapt to however many crumpet rings you have (this is why I included metric measurements). Or your schedule, and starter (depending on your starter, it may not like being risen in the fridge for instance). This is simply a (hopefully solid) point to jump off from. Feel free to let me know where you land (as long as it’s delicious!).
How to cook with what’s available
AKA, how to cook during a pandemic. Orrrr… how to cook with the few items left in the grocery store. Or how to create and adapt recipes to what you have. And hopefully, by the end of this post, how you’ll cook most of your meals, because it’s also how to cook more resourcefully.
With many of the major supermarkets out of random things, following recipes is tough right now. If you can afford those organic produce boxes but are unsure about how you’ll handle a bunch of random ingredients, this is also for you! This post is for people who can follow home cooking recipes already, but want to turn limitations into an opportunity for creative learning.
As we make history by staying home if we can, here’s how to put dinner on the table with what’s available. This is a long post, so make a cup of tea, curl up, and nestle in.
Shop by food group rather ingredient
Start thinking about the role ingredients have in a meal, rather than the ingredients themselves. Most fall into the following two categories. Food groups = carbs, proteins, veg (+fruit), and everything else is what I call “flavour boosters.”
Flavour boosters are basically sauces, seasonings, herbs, spices etc. Their role is to add extra:
- Flavour – sweet, salty, bitter, sour. And umami (eg. soy sauce, parmesan). Knowing your plant-based-umami will help you stick to more plant-based eating.
- Texture – crunchy/crispy (toasted seeds), creamy (plain full fat yogurt)
- Characters – earthy (mushrooms), zingy and refreshing (lime), rich (butter), herbaceous
When you shop or think of what’s already in your kitchen, ask yourself: what food groups do I need, and which ones do I already have? For example, my personal meal ratios are 1 part carb, 1 part protein, 2-3 parts veg, and a dash of booster. I’ve stopped thinking: I need rice, chickpeas, broccoli, carrots, soy sauce and honey. Instead, I look at what’s available and figure out what I’m cooking based on what happens to be available, “on spesh”, and in season.
If you’re new to this, use famous cuisines to guide your flavour booster selection. For instance, if you like Chinese flavours, keep the following stocked up where you can: ginger, soy sauce, and spring onions (otherwise known as “shallots” in Australia, or “scallions” in the US). And if there’s one super flexi booster to have on hand as much as possible, it’s passata (tomato puree) – it’s a little sweet, sour, salty, and umami all in one, and is just waiting for you to decide which way you want to amp that up. There’s a reason canned tomatoes fly off shelves!
Bonus tip: Pick mostly long-lasting, or freezable veges (eg. not more than 1 lettuce for 2 people in a week), so you aren’t left with heaps of slimy stuff to chuck at the end of the week!
Making meals with your new food groups
Whether you do meal planning (which I’d advise if you’re new to this) or want to cook on the fly, this is usually the creative fun bit!
For weekly meal planners:
I keep rough lists of my food groups, which get updated each time I do a shop. Next to these lists is where I plan out the week with meals for each day, starting with the most delicate ingredients (like lettuce, which I actually never buy for home cooking anymore because it tastes meh and I can’t ever get through it in time – plus it doesn’t freeze).
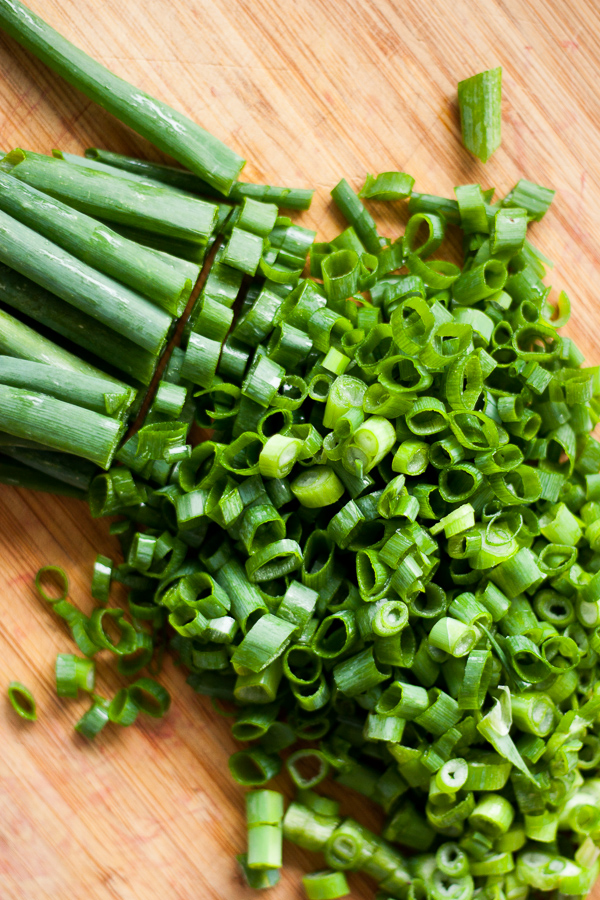
If anything doesn’t look like it’ll last a week (eg. spring onions and kale are almost always in my freezer), chop it up and freeze it when you get home (I love silicon bags which are a plastic-free alternative to zip lock bags, but you can also up-cycle some takeaway containers). This is your chance to put some music on for a kitchen boogie!
For frenetic cooks:
If you can’t plan to save yourself, that’s fine – you’re probably better off shopping once every few days rather than doing a whole week of shopping at a time. It’s still helpful to have (digitally or in your head) a list of what you have in each of the food groups.
Either way – here’s how you make your recipe magic
For a home cooked savoury lunch or dinner :)
- Start with your veggies (if those are the bulk of your ratios) – if you can, pick a variety of final textures and flavours. Eg. crispy bitter lettuces will love something sweet and soft, like roasted carrots, or a beautiful ripe tomato.
- Add a carb and protein that will, as much as possible, fill any texture gaps you might have. Eg. slaw goes so well with mash and chicken because the crunchy, hopefully punchy sweet/sour slaw balances with soft mash and a mild umami protein. If you’re vegetarian, super-soft chickpeas and something like avocado would be a great addition to a slaw instead – those all achieve similar roles.
- Fill the last flavour or texture gaps you have with your choice of flavour boosters, or think of a flavour you’re craving at the moment and amp it up. Eg. If I feel like something refreshing, I’ll usually pick sour and zingy as my dominant flavour, so I’ll turn to lemon or lime juice as the main component of my dressing with something like avocado to mellow it out a bit. If it’s winter and I want comfort food, I’ll be assembling every bit of umami I can (vegetarians, I got ya back here).
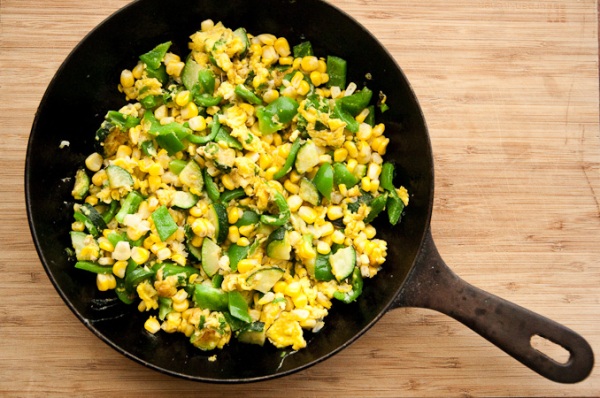
- Assemble in the order of longest to shortest cooking time. Eg. If I’m doing stir fry on rice, I get the rice cooking first, then prep everything else while it cooks.
- Use fat, salt, and acid to taste, and keep tasting as you go – and match the fat to what you’re cooking too if you can. If your dish is still bland, add a bit more salt and/or fat depending what’s lacking. Then taste, really engage your senses, and balance from there. If it just tastes like salt, broaden the flavours with sweet or sour sauces, herbs or spices. I still struggle with curries and usually end up adding a ton of palm sugar, and that usually fixes it (also, makes me realise how much sugar must go into take out). Always taste before you plate something you’ve made for the first time.
Optional but bonus tips
Layer fat and salt. “Salt from within” is one of my favourite terms from chef Samin Nosrat (her book and Netflix show Salt, Fat, Acid, Heat is a seminal read/watch). It’s basically what happens when you marinade in something salty, salt your cooking water before your food even goes in, or brine anything – and then add finishing touches of salt later.
Layering fats means that instead of only cooking in fat, you might drizzle with a complementing oil when you’re serving (like a fancy olive oil). This adds a kiss of life for a dish and takes it from weeknight to special. Also, if the oil in your pan dries out, add more (I usually add some toum in the last 2 minutes of whatever I’m cooking at a medium high heat). If you’re worried you’ll eat too much fat, you can reduce your animal proteins and up your veggies to balance out.
Browning is your friend. Golden brown roast potatoes. Letting your stir fried veggies get a speckle of char. Searing your meat, haloumi or tofu to get a brown crust in the pan. These all mean caramelisation (or a Maillard reaction if you wanna get food-nerdy). And they add depth to your flavours.
A touch of sweetness goes a long way. For a long time I was slightly ashamed to admit there was something missing from my home made tomato sauces. Now I realise that was sugar (or brown sugar for extra deliciousness). When you first switch from commercial to home made sauces, you’ll notice this pretty quickly. If you miss it and you’re trying to eat less sugar, do it gradually, and prioritise sweet things that bring you the most joy. Then cut back sugar where you don’t miss it as much.
Start deconstructing and adapting recipes. My hope with this post is that you’ll also start seeing ingredients in a recipe for the role they play. That makes it much easier to make a recipe your own, switching out specific ingredients with the ones already in your kitchen and community any time of year. While the need for that is more urgent right now, I hope it’s something you can carry with you.
I’d love to hear how you go, and learn from your tips too! I’ll be monitoring comments on this post for the next 2 weeks and will try to reply if you have any questions (and edit my post where things are clearly confounding people).
Stay food-curious friends xx
Zo
3 unexpectedly delicious ways to use grated radishes
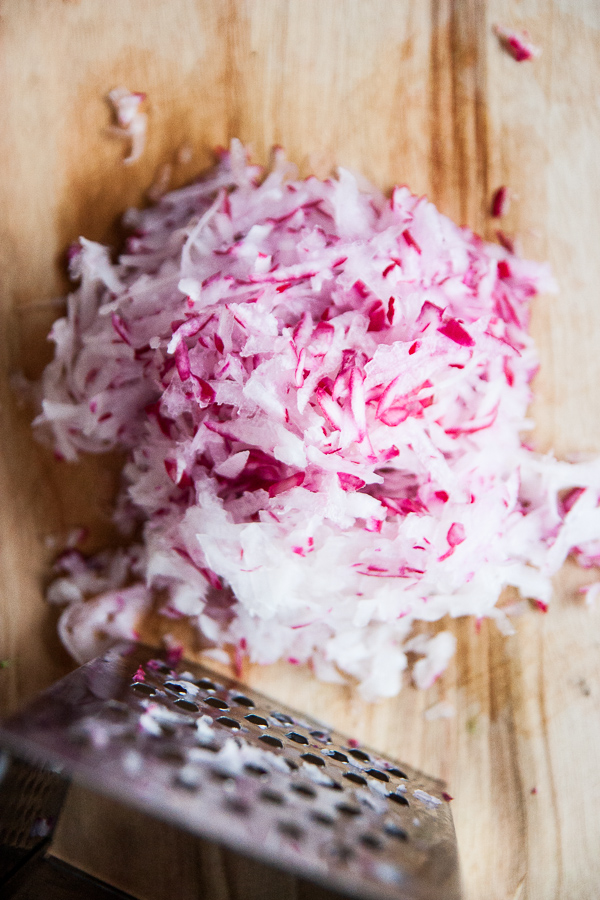
Confession: I used to buy radishes because they’re beautiful, not because I particularly liked to eat them. You see, every week I have to get something that gets me excited for the dinners ahead, something vibrant (like radishes) or quietly beautiful (like beetroots). Mostly this works out fine, but radishes – well, they’re just a little loud to for using in large quantities. I prefer to use them almost like a garnish to avoid complete eradishification of flavour. This used to mean radishes slowly growing hairy in my fridge (seriously…they grow little white roots like an old man who hasn’t shaved in a month). Given how much I rail against food waste, it was time to find some more delicious, practical ways to enjoy this beauteous vegetable. Here are my 3 favourite ways to use radishes so far. Each recipe effectively forces the aggressive peppery radish into Calming Down, so you can enjoy a respectable quantity without blitzkrieging your tastebuds. You can also use daikon radish although unless they’re homegrown they’ll be much more watery, so you’ll have to squeeze some of the moisture out for the sauce.

Herb-flecked radish yogurt sauce
This is like an even prettier version of a tzatziki. If you have any leftovers, turn into a yummy dressing for potato salads: add 1 part mustard and triple the quantity of olive oil, and mix until smooth.
- 1 part extra virgin olive oil
- tiny amount of raw garlic (use the little middle cloves, about 1 per cup of sauce)
- coarse sea salt to taste
- 3 parts fresh chopped fresh tender leafed herbs (I used dill, basil and mint) – do not try and use dried herbs!
- 3 parts grated radish
- 4-5 parts thick greek yogurt
Bash garlic clove(s) into oblivion in a mortar and pestle with salt. Stir everything else in. Serve with crusty breads or pita toasted till it’s crunchy, or grilled red meat, or drizzle over a simple salad of cherry tomatoes and cucumbers.

Caramelised onion & radish scramble
This sweet/salty umami bomb is simple comfort food at its best, inspired by the turnip version at The Amateur Gourmet. Paired with the Whole Radish Bacony Congee (pictured underneath, recipe below), this is an easy mid week meal (recipes serve 2).
- 4 large eggs, beaten with 1/4 tsp salt
- 1 small onion, halved and finely sliced
- 2-3 grated radishes
- 1-3 Tbs ghee or butter & cooking oil
- 1/4 tsp salt
Heat half the ghee in a large frypan on high heat with the radishes, onion and the salt. Brown the undersides and mix, until everything is nice and golden (see pics from Amateur Gourmet). Pour in eggs and let set a little before twirling and flipping to scramble. As soon as the wet raw parts of the egg disappear, dish it up.
Whole Radish Bacon-y “Congee”
Congee is a porridge made with plain rice and water, but here bacon fat & juice leftover from cooking bacon the amazing way is used to flavour the congee and make it utterly irresistible (note: if you are cooking the bacon the way specified in the video, I poured off the last tiny bit of water and the fat before all the water evaporated, and put it in the freezer for opportunities like this congee, or soup, or whatever you want to add bacony flavour to). You can substitute miso paste & smoked paprika if you’re strictly vegetarian. While we’re totally bastardising congee, use radish greens to offset the richness of the bacon nicely, with the stalks provide a crispy texture to contrast with the soft eggs and rice.
- 3/4 c rice (I used arborio but you can use short or long grain)
- 3 cups water
- around 1 Tbs each bacon fat and juice (see para above)
- the greens from 1 bunch radishes, finely chopped (about 1 1/2 packed cups)
- 2-3 radishes, grated
- 1/2 tsp salt (more or less to taste)
Bring rice and water to the boil in covered saucepan on high heat, then reduce heat to low once boiling. Stir through radishes, bacon fat and juice, re-cover pan and set timer for 15 minutes. Uncover, stir and scrape the bottom of the pan, then re-cover and simmer another 5-10 minutes until rice is totally cooked and soft. If it’s too soupy, blitz a bit with a stick blender (be careful to fully immerse the blender in the congee unless you like burning hot pain). Add salt and radish greens and stir through, scraping the bottom again. Cover (unless too soupy) and let simmer another 5 minutes, then turn off heat and let sit for 5 minutes to help any stuck bits in the pan come unstuck before serving.
If you can’t be bothered making the scramble to serve with this, you can also cook some whole eggs in – add about 5 mins before adding the radish greens and just be careful when stirring not to break the yolk.
Frico (crispy cheese) roast potatoes
Adding parmesan to roast potatoes is nothing new, but every time I’ve made roast potatoes with cheese I’ve been too stingy, so the result makes me question out loud where the cheese went. Turns out the solution is to go totally overboard, to the point where you get a nice tailcoat of properly, noisily crunchy cheese layer that clings to each chunk of potato, promising pure rapturous joy with every bite. 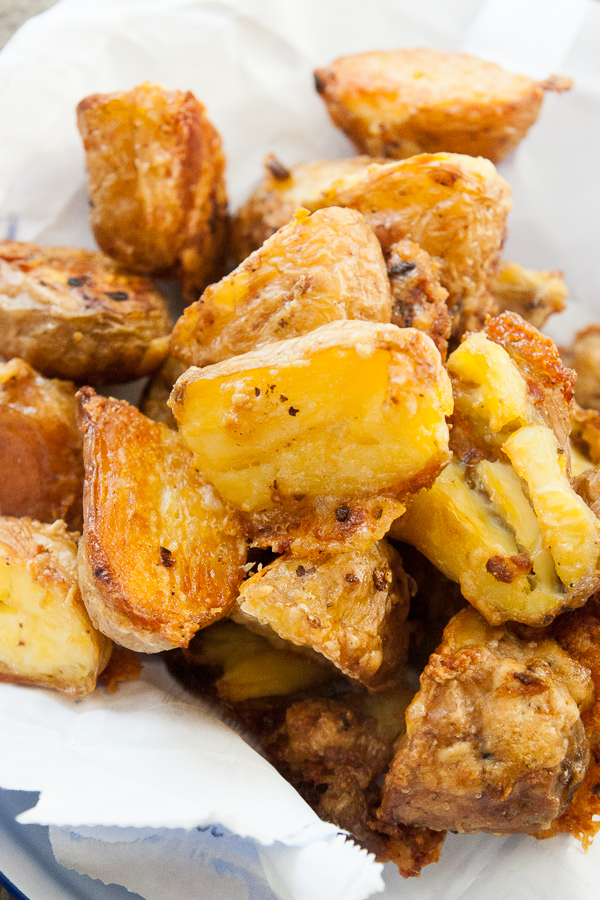 These do require some patience, so I’d suggest a pretty simple, light salad to help offset the crazy richness.
Frico roast potatoes
a guide to make as many as will fit roomily on your largest baking tray
You start off with good fluffy roasting potatoes*. Wash and cut them into nice large chunks about 4-5cm (that’s over an inch). Pop them into a saucepan and cover the bottom 3cmish (about an inch) with water. Pop the lid on (a nice fitting one to maximise steam). Preheat oven to 200C (400F), with a rack arranged at the top. If you’re baking two trays you’ll need to swap them around half way through.
Bring potatoes to a rapid boil from cold on max heat, then reduce head to low to let simmer for about 10-15 minutes or until a knife slides in to a piece of potato easy.
While the potatoes simmer, finely grate more parmesan than you think you’ll reasonably need (enough to completely coat each piece of potato remember). Prepare a few cubes of butter or ghee too. Drain completely, pop back into the dry pot, sprinkle over the cheese, a nice few grinds of black pepper or pinch or herbs, and the butter cubes (I also added salt but felt this was probably overkill with all the cheese). Cover and shake the pan almost like a cocktail (so, holding on the lid for dear life), but circular-ly so the bottom potatoes get some cheesy action. Tip the potatoes onto your baking tray and arrange them as spread out as possible – the potatoes must be on a single layer and have around 1cm between pieces or they won’t crisp.
Bake for 30-40 mins until golden brown. Let cool for 5 minutes to let the cheese fully crispen and to avoid sad burnage.
Currently Clickalicious
Sardinian honey and cheese pastries
Roasted eggplant & noodles with Chinese black vinegar dressing
*My favourite in Sydney so far are the blue moon/royal blue potatoes. They have an amplified potato flavour, and even the crappy supermarket version turn out beautifully every time. Plus they’re definitely sort of floury but not mealy, and form a nice crisp layer when boiled first, with or without copious amounts of cheese.
Simple seasonal cake, and cheating “room temperature” ingredients
Sometimes the simplest cakes, made with careful love and attention to detail, work best. The base for this cake was adapted from Will’s Gran’s beloved coffee cake recipe, which I’ve used several times now and am just in love with. It’s fluffy and soft, but deeply fragrant of buttery richness, with the fruit keeping it moist for a few days after. I used plums and blueberries, but pears in winter would be lovely for example, or apples in autumn. Admittedly blueberry season has passed, but I had 2 kilos (yes, you read that correctly) carefully squirreled in my freezer after a gorgeous morning of blueberry picking.

I’m even more keen on buttery cakes like this now that I’ve figured out a few sneaky ways around the “room temperature” ingredients rule, without butter splattering your microwave. I basically pop some chopped butter in the oven for 5-7 minutes while it’s preheating, so it’s half melted. Then I beat in the sugar and the cold eggs from the fridge one at a time, which kind of brings the butter back to a slightly firmer temperature, to help incorporate plenty of air. Then I don’t have to worry about melting the butter entirely either. Voila!
Simple seasonal bounty cake
makes one 9″ cake
- 2 handfuls of fruit, chopped to bite size
- 120g butter, cut into cubes (if using unsalted, add a pinch salt)
- 120g caster sugar
- 2 large eggs
- 145g plain flour
- 1 1/2 tsp baking powder
- 2 tsp vanilla extract (optional)
Chop fruit and set aside. Preheat oven to 175C (350F), arranging a rack in the middle of your oven. Grease your baking tin with plenty of butter (I brush some of the melted butter into the tin), then dust it with flour.
If you have fridge-temp butter and eggs, leave your mixing bowl with the butter in the oven for the first 5-7 minutes until it’s half melted (don’t panic if you end up going too far). Beat (on high speed) in the sugar and one cold egg (or room temperature egg if your butter is softened butter) until fully incorporated and paled. Beat in second egg and vanilla. Sift over flour and baking powder and fold through (low speed) until just barely incorporated – if there is a fleck or two of flour, that’s fine. Scrape into cake pan, pop fruit on top (scattering is fine – no need to carefully place because it all sinks in anyway), and bake for about 25 minutes. Reduce temperature to 150C (300F) and continue baking until centre also takes on a golden brown colour and a skewer inserted in the middle comes out clean (around another 15 -20 mins).
Cool to room temperature before inverting onto a plate. Super yummy with 100% natural yogurt, diluted with a little milk if it’s the super tart stuff.
If storing, bring back to warm room temperature before serving for maximum deliciousness.
Currently Clickalicious
Cauliflower gnocchi with cream cauliflower and shiitake mushroom sauce
Brussels sprouts with pine nuts and thyme
Passata, my champion of sauces
Bottled passata is my go-to base for just about any tomato-y sauce, soup, or stew, mostly because it’s so versatile. However I’d never really appreciated how much work it takes just to get to the bottle. Last year, I joined the Youth Food Movement Sydney crew to cook, de-skin and de-peel countless local tomatoes to turn into one of my favourite pantry staples. This year you can either host your own passata day, or if you’re in Sydney, crank out some of your own and join other foodies for hand made pasta with the very passata you make on the day! Can’t get much fresher than that!

So when would you use passata instead of any other tomato goop? Well personally I reach for it when I don’t want the distractions of the seed and skins, or I only want to add a background tomato richness to something like a stew or a mushroomy sauce. If I want it chunkier because the tomato is the central element, sometimes I’ll go for a mixture of passata and some chopped tomato, so the sauce both covers and has body. I also use passata instead of tomato paste on pizzas, as I find it dries out less when you’re going for the minimalist approach on a good homemade base. Speaking of minimalist, passata is usually just made of tomatoes and salt, so you don’t have to search for questionable ingredients in a long list (you choose the sweetness too, not the manufacturer). The other reason I like to choose passata is that it never takes on the taste of the can (usually because it’s in glass bottles), and you can quickly see the thickness and quality by tilting the bottle and seeing how liquidy it is. Plus ya know, Sydney doesn’t appear to have very plentiful access to these san marzano tomatoes that every reputable food blog seems to wax lyrical about!
Have you ever tried making your own tomato goop of some kind, and what kind do you generally use the most and why?
2 amazing dips for effortless holiday eating and entertaining
Making copious amounts of amazing homemade dip for the holidays seems to be turning into a very handy habit, despite my fickleness with food. Every now and then I get this niggly feeling like I should be overthinking my next meal just like everyone else seems to around this time of year…but then I remember I have a zillion dips in the fridge.
With a few homemade dips in the fridge, you’re just a loaf of bread, bottle of passata, or bowl of potatoes/pasta away from a delicious, effortless lunch or dinner, that seems like you’ve slaved away, when actually you practically just mixed some stuff in a bowl. As a bonus for those of us enjoying summer Christmasses, you’ve also always got options in the fridge for an impromptu picnic. Then there is the very awesome feeling you get when several people at a potluck dinner ask who made this dip, and you get to shyly put your hand up (ok who am I kidding, I totally owned that shizz).
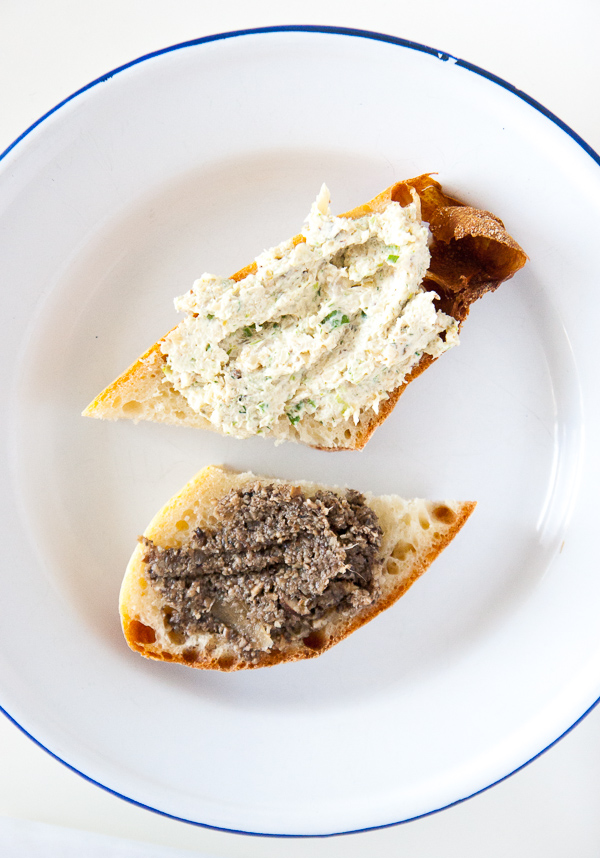
Here are two of my favourites, which also happened to elicit a lot of the aforementioned hand-raising at a recent potluck. On top, a creamy, herbacious roasted cauliflower dip; below that, a caramelised mushroom, onion, garlic and thyme dip, which really needs no selling at all. Bonus: they’re both incredibly fun to make. The oven does the work for you, and then you get to do the fun bit of putting things in a bowl and blitzing, tasting and adjusting seasonings as you go while reliving all your childhood reenactments fantasies of being one of those people on TV who cook all day long and get to say “and here’s one I prepared earlier.”
If you’re planning to serve these up for New Years, you can give this super quick cheat’s ciabatta a roll too, using other racks in the oven for dip components while it bakes (note you want a warmish kitchen for that bread). This way everything can be done in advance so when your friends arrive you can be ready to mingle while everyone asks what the amazing aroma in the air is. Of course you could also do some crackers or something (salt and vinegar kettle chips/crisps are pretty outrageously amazing with these dips, as I discovered).
Creamy roast cauliflower dip
makes 2-3 cups, and you can do more florets than specified below and reserve some for pasta or to mix into a salad.
measures very approximate – let your taste buds guide you!
- 2 large handfuls cauliflower florets (walnut sized)
- cooking oil
- 200g tub sour cream
- 2 T finely chopped dill (tarragon or basil could be nice too)
- 2 T sliced spring onions/scallions (some white and some green parts)
- 1 Tbs capers (with their brine or salt), or cornichons would be yummy too
- 1 Tbs dijon mustard
- freshly ground black pepper, salt to taste
- optional: few drops sherry vinegar, or lemon zest & juice
Brush florets with plenty of oil, sprinkle with salt, and roast at 200C (400F) on a single layer until plenty of brown splotches appear and the cauliflower is easily pierced with a fork (about 20 minutes in a preheated oven, but you can start these from a cold oven). Blitz with everything else in a blender, food processor or with an immersion/stick blender. Taste and adjust seasonings as desired.
Caramelised mushroom, onion, and garlic dip
makes just under 2 cups
measures very approximate – let your tastebuds guide you!
- around 500g brown button mushrooms (portobellos are the next best thing, but I don’t think they’d be as nice), halved/quartered so they’re all roughly the same size
- 1 large onion, chopped into 2cm dice
- 6-7 large garlic cloves, crushed (peel them after they come out of the oven, much easier)
- optional: sprigs of thyme or rosemary or both
- cooking oil and (optional) butter
- salt and pepper to taste
- optional extra virgin olive oil at the end
Brush mushrooms, onion, and garlic with oil, and arrange on a baking tray, not too spaced apart – you don’t want them to dry out too much in the oven. In fact I even washed my mushrooms in water (yeah, this is technically a no no in the culinary world, but in this case it resulted in a moister end product). Dot with small slices of butter, and season with salt and pepper. Bake at 200C (400F) until the mushrooms are golden brown, the onions are soft, and there’s some juicy stuff lingering about. Pop your herbs in and mix things up on your tray to coat everything in the juices. Lightly cover with tinfoil (or in my case, I just folded over my reusable nonstick sheet a bit to partially cover the mushies), and turn off the oven, but leave the mushrooms in for the next hour.
Remove garlic skins, and herbs, and blitz in a blender, food processor or with an immersion/stick blender. Taste and adjust seasonings as desired.
Currently clickalicious
Braised celeriac galettes with mushroom filling and a red wine sauce
Scallion pancakes (that’s spring onion for the non-Americans)
Silky aubergine dip with dill and basil
It’s not even Christmas yet, but all I want is some salad and water. Actually, that’s something I overhead at my work Christmas party from the suspiciously blonde girls looking at their champagne as though it was a form of slow torture. I’m secretly reveling in all the deep fried nibbly things that inevitably get passed around at this time of year. But then at some point, I do start craving veges – nothing so airy as salad though. No, I’m talking about dense vegetable maximisation. A plate consisting of nothing but vegetables, that you dig in to with gusto.
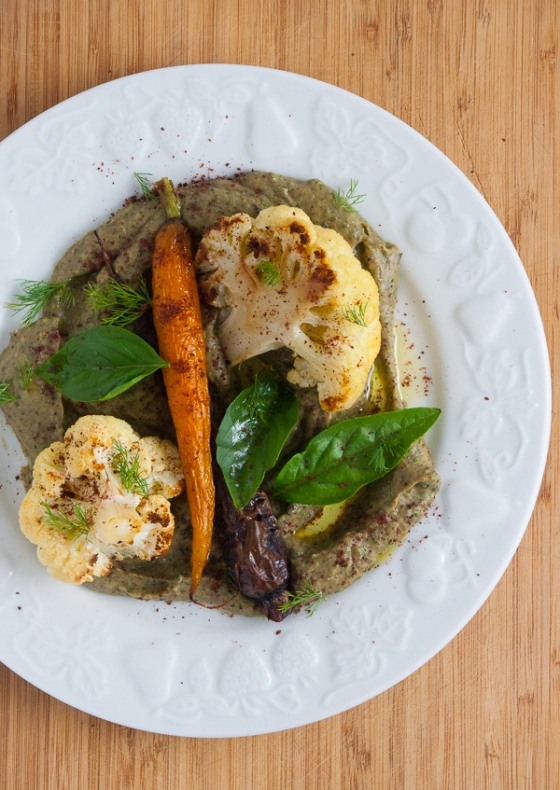
Essentially, the roasted veges lie in a creamy, smoky, herbaceous smattering of aubergine dip, that resembles a lighter version of baba ganoush. A light dusting of sumac, some fresh herb leaves and a drizzle of olive oil make things look a little less spartan, but to be honest, this is wonderfully vegetably comfort food that doesn’t need to be pretty past the first bite. Thankfully, because would you check out the colour of that dip? It does have many virtues – deliciousness, versatility, relative simplicity – but prettiness is probably not one of them. When you use veges as your dip delivery mechanism, you can eat as much as you like without wishing for “some salad and a water,” while still feeling like you’ve indulged in many of life’s greatest pleasures. Also, you can have cake for breakfast (tick) and still easily get in your five plus a day. If you do go the veges dipped in veges route, I’d highly recommend getting really fresh veges, or things are going to taste pretty mellow. There is a noticeable difference between real basil and wispy supermarket basil especially. Lastly, of course feel free to use other herbs and spices. Oregano, coriander/cilantro if you’re a fan ,and tarragon would all be lovely. I just happen to love the way dill and basil turn roast veges into something summery.
Wondering what to serve this with, other than veges? It’s phenomenal with toast, eggs, crunchy raw veges, lightly crushed lentils or beans, and seafood. A little crumbled feta wouldn’t hurt, especially the creamy stuff. It can be served warm or cold, but I prefer room temperature. This makes it fairly versatile, to say the least. I’m wishing I made more to be honest!
Silky aubergine dip
Thanks to Simon Said for the inspiration The first time I tried some of his dip at the farmers market I bought two containers and they were gone in two days.
Makes about a cup and a half. Measurements very much approximate, so taste and adjust as you go!
- 4 fist sized aubergines, destemmed
- about 1/3c very finely chopped fresh dill, tender stalk bits only (the bits near the tip)
- around 10 basil leaves
- juice and zest of half a regular sized lemon
- optional: a few drops of sherry vinegar (or just more lemon)
- optional: smoked paprika or liquid smoke if you don’t have a gas burner/bbq
- optional: sumac for finishing
- optional: tiny splash of cream, or just go bananas on the olive oil at the end to keep this vegan friendly
- salt to taste
- cooking oil for baking and extra virgin olive oil for finishing
Preheat oven to 200C (400F).
Over a naked flame with a fork, blister the skins of each of your aubergines. If you don’t have a gas burner, you might be able to do this under a grill, or over a BBQ, or just proceed to the next step.
Cut each aubergine into 2 inch chunks, and place on an oiled baking tray. Brush generously with oil and sprinkle with salt, and cook for 20-25 minutes until golden brown splodges appear and a fork goes through with no resistance (the insides should be mostly translucent. Let cool slightly to help unstick the pieces better, then blitz with a stick blender with all the other ingredients. Taste and adjust seasonings until you’re satisfied.
Currently Clickalicious
3 rewarding and easy ways to get more out of your food dollar
With Christmas coming up, most of us will be preparing for some serious feasting. Unfortunately it’s also when we collectively generate the most waste. The surprisingly huge environmental consequences of food waste are hard to brush aside. Around one third of the world’s agricultural land is used to produce food that is subsequently not eaten. This land is often “created” by displacing forests, the animals that live in those forests, and the valuable ecosystem services they provide. Furthermore, growing, processing and distributing food racks up a lot of emissions. In Australia, the food supply chain is the next highest generator of greenhouse emissions, after power stations. After all that, 222 million tonnes of food is then thrown out each year in wealthy nations (in Australia, it’s 4.5 tonnes).
Fortunately, there are plenty of rewards you get from reducing your food waste, beyond a healthier budget and clearer conscience. As it turns out, a lot of the food we throw out is actually really good for us and our tastebuds, if only we’d give them a look in. Here are three discoveries I’ve found really helpful…
1 Get adventurous – try the whole vegetable
While “nose to tail” animal eating has become a pretty well established concept, most of us still readily depart with our broccoli stalks, potato peels and carrot tops, unnecessarily binning perfectly delicious ingredients in their own right. If you don’t believe me, check out Root to Stalk Cooking by award winning food writer Tara Duggan, or this New York Times article from 2011. If you grow your own veges, you get even more bonus ingredients that most foodies would pay through the nose for (or not even be able to buy at all!). Younger broccoli leaves for example are basically like kale, and snow pea shoots are already enjoyed in many Asian dishes. If you’re ever unsure, a quick Google will often give you some ideas and fresh takes on your usual favourite dishes.

Fritters made with fennel fronds and leek greens
2 Friend your freezer
If you come home from your leisurely trip to the farmers market only to realise you’re never going to get through those three bulky items that need to be eaten super fresh – don’t panic just yet. Spring onions (scallions/”shallots” in Australia) are a classic for going wilty and slimy in the bottom of the fridge. Ensure they never die a slow death ever again – slice up the green parts when you get home and pop them in a freezable container. They separate easily even when frozen and are super handy to throw in when you’ve got them pre-cut. Spinach and many other cooking greens can be pre-cooked and frozen in ziplock bags too, making your meals down the track that much quicker too. Those pricier artisan style breads can be sliced and frozen too for easy breakfasts (simply toast your slices to bring them back to their original glory).

My homemade bread in a freezer baggie
3 Get real when meal planning & be flexible
At first when I followed the conventional advice to “plan my meals” and “shop with a list” too stringently, I found myself spending more, not less. I was missing out on specials, and often resorting to take-out when the meal that day just wasn’t what I felt like eating. It was also incredibly boring. If you also suffer from these setbacks, I’ve found it really helpful to learn roughly how many “bags” you’ll eat in a week and bring that many bags with you when shopping. Then fill only the bags you’ve brought with appealing, seasonal, “on special” items. Aim to get less than 2-3 items that can’t be frozen and will go sad in less than 2-3 days (eg. lettuce). When you get home, pop all fresh ingredients into a spreadsheet (I use Drive so everything is on my phone and sharable), and then roughly plan a “menu” for the week. You can then pick what you want the most that day or is realistic to cook if you get home late. With the available ingredients in a list beside your menu items, it’s easy to re-configure a menu item. It can sometimes be handy to leave one day free that week for surprise social outings, or for using whatever you have left over in a bit of a lucky dip stir fry, salad, soup or stew. I’ve enjoyed a lot of surprisingly delicious new combos this way! Of course this approach might not work for everyone – so keep adapting until you find a sweet spot.

A sample weekly meal plan, which will inevitably get chopped and changed
Some great tips from commenters in my last post about food waste:
Use your food scraps to create compost for your garden (or someone else’s). I’ll add that if you’re in an apartment, try a worm farm.
Skip and swap ingredients in a recipe based on what you already have and save time shopping too!
Buy only what you need. I’ll also add here that I try and impose a “1 treat limit” per weekly shop since I’m only human – but this way I get the thing that I really want, rather than something I just bought on impulse.
Resources to help you rethink waste more generally this Christmas:
- Planet Ark’s 12 Do’s of Christmas offers simple advice, including some food waste tips
- 1 Million Women have heaps of ideas to help you celebrate a no-waste Christmas
- “Fill hearts not landfill” with Karma Currency for charitable gifts
What have you found works well to reduce your food waste?

Merry Christmas! Here’s our tree made of previous years’ cards, that’s both reusable and recyclable.
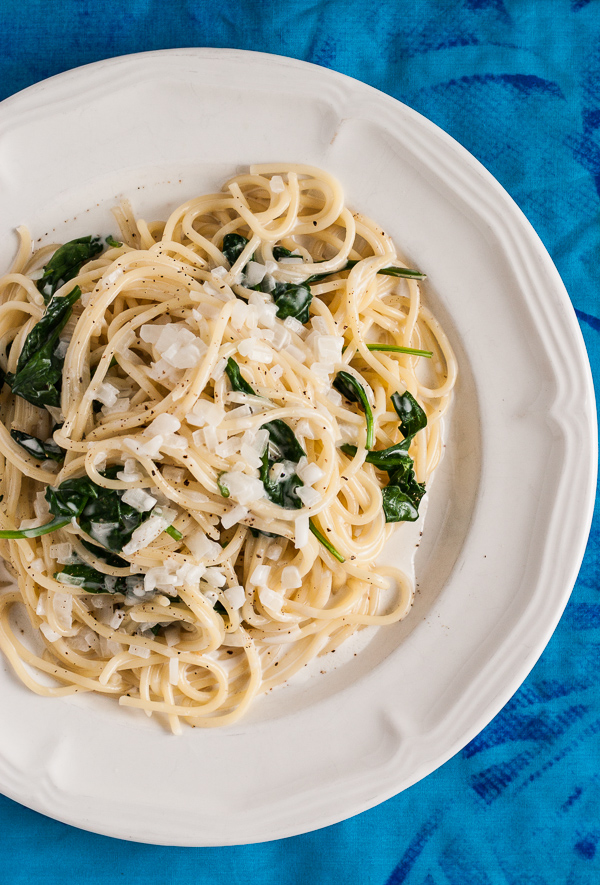
Mindblowingly simple coconut sauce: 3 ingredients to weeknight bliss
This spaghetti was born on a “why-isn’t-it-Friday” Monday, inspired by our hands down favourite Samoan food, palusami (ok, maybe a close tie with the pina coladas with freshly made coconut cream). Our friends’ Lonely Planet guide described palusami as “calorie bombs” of coconut cream and we knew we had to try them. Fortunately, we were lucky enough to enjoy these creamy parcels made the Samoan way – wrapped in fresh taro leaves, then banana and breadfruit leaves, and placed atop some taro root that roasted in red hot stones covered with a motherload of banana leaves (all part of an umu). You should have seen the four of us descend upon the deliciously ugly, curdled, almost cheese-like palusami, with hunks of roasted taro. We cleaned up every last drop within minutes, after a somewhat hesitant start.
Since taro leaves and fresh coconut cream is a little hard to come by in Australia, and an umu is definitely not a weeknight sort of a meal for the average 9-5er living in an apartment, I was keen to make something with similar flavours. Lazily. All you do is finely dice a large onion (or 2 small), pour over a 400ml can of coconut cream, add salt to your taste, bring to a boil then simmer to thicken slightly. Crush the onions slightly with a masher to soothe your impatience release more of their flavour.
Interestingly the sauce doesn’t curdle like it did with fresh coconut cream, but for presentation purposes, I consider this to be a bit of a bonus, even if the result doesn’t taste quite so transcendental.
What could you possibly use this amazing sauce on? Aside from drowning some spaghetti and spinach in it you mean? Well, we had the leftover salty oniony coconut cream cooked and drizzled over our fish while we were in Samoa (highly recommended), so chicken or tofu would love it too (or Quorn, which I’m growing worryingly addicted to on this damned low nickel diet). You could easily replace spaghetti with rice noodles or baby spinach with large punchy basil leaves. Or tip it over rice and veges. If you find yourself with a pool of it on your plate and aren’t a licker, deploy some crusty bread for mopping it up.
It’s time for a confession about pasta too: I like mine slightly overcooked. There, I said it. Not canned spaghetti mush levels of overcooked, but definitely a leap hop and minute past al dente. Judge away, but I have a real aversion to al dente, unless it’s fancy pasta or fresh pasta, which is definitely no longer a Monday evening endeavour.
Spaghetti with salty coconut sauce & spinach
Serves 3-4, remembering it is quite rich, even though it doesn’t look that way
- 250-300g spaghetti (half a standard 500g packet if you’re in NZ or Australia)
- 2 handfuls baby spinach
- coconut sauce (see text in bold above)
- optional: freshly ground black and/or white pepper to serve
Cook pasta* to your preferred firmness, drain in a colander, set aside.
Make coconut sauce (in the same pasta saucepan is fine). Once it’s been simmering for a few minutes, or until the onion is softened, add the pasta back to the pan, along with the spinach. Stir everything to coat the pasta and just wilt the spinach, then taste and salt further if necessary before serving. I realised after I took this photo it’s better to serve this in shallow bowls. Take note!
Enjoy with a few cracks from your pepper grinder if you like, otherwise, enjoy! If you feel there’s too much sauce, you can drain some off, and refrigerate for another meal. I kinda like it borderline soupy though.
Clickalicious
Pomegranate white chocolate pistachio cookies
Applesauce carrot bread with pecan streusel
*Confession number 2: I almost never use bucketloads of water to cook my pasta, and once I put the pasta in, turn the heat down to low and simmer the pasta, covered, just stirring every now and then. I feel like this saves energy and works perfectly fine in this particular dish. Feel free to keep tsking.


